These Easy Cottage Cheese Wraps are a game-changer for anyone trying to eat healthier without sacrificing flavor. The wrap itself is made from just cottage cheese, egg whites, and spices - no flour! Best of all, you can make it two ways: quick and easy in a skillet, or hands-off in the oven for batch prep. It’s the perfect high-protein, low-carb option for busy days.

This post may contain affiliate links. Read my disclosure policy.
One of the best things about this cottage cheese wrap is how versatile it is. You can fill it with whatever you have on hand - think spinach and feta, grilled chicken and avocado, or even leftover roasted veggies. For a fresh, protein-packed variation, try filling this wrap with the flavorful chicken salad from my Croissant Chicken Salad Sandwich or the hearty mix from my Chickpea Salad with Avocado and Quinoa. Both make delicious, healthy fillings that hold up well in this cottage cheese wrap. The wrap itself can also be customized with different spices. Add turmeric for an earthy, golden touch, a pinch of chili flakes for heat, or even a little za’atar to switch up the flavor.
Recipe Overview
- ⏱️ Ready in: 15 minutes for pan-fried version, 40 minutes for oven-baked
- 🍽️ Serves: You’ll get about 3 wraps
- 💪 Diet-Friendly: Gluten-Free, Keto-Friendly, High-Protein
- 🌿 Vegetarian Option: Yes — skip the bacon bits
Jump to:
- Recipe Overview
- Why You'll Love These Cottage Cheese Wraps
- Ingredients
- Substitutions and Variations
- Step-by-Step Instructions - pan-fry method
- Oven-Baked Version for Cottage Cheese Wraps
- Pan-fried vs. Baked Cottage Cheese Wraps
- Recipe Tips
- Frequently Asked Questions
- What to Serve With the Wraps
- Related Recipes You Might Like
- Recipe
- Comments
Why You'll Love These Cottage Cheese Wraps
- High in protein: Thanks to cottage cheese and egg whites!
- Low in carbs: Made with just cottage cheese, egg whites, and spices, it skips the grains entirely while still holding together beautifully. It's great for low-carb, keto, or diabetic-friendly meal plans.
- It's customizable: Like in this 7-Layer Taco Salad, you can swap in your favorite fillings or spices to suit your taste.
- Meal-prep friendly: Make the wrap ahead and fill when ready to eat.
- It fits a variety of dietary needs: It's naturally gluten-free, keto-friendly, and vegetarian.
Ingredients
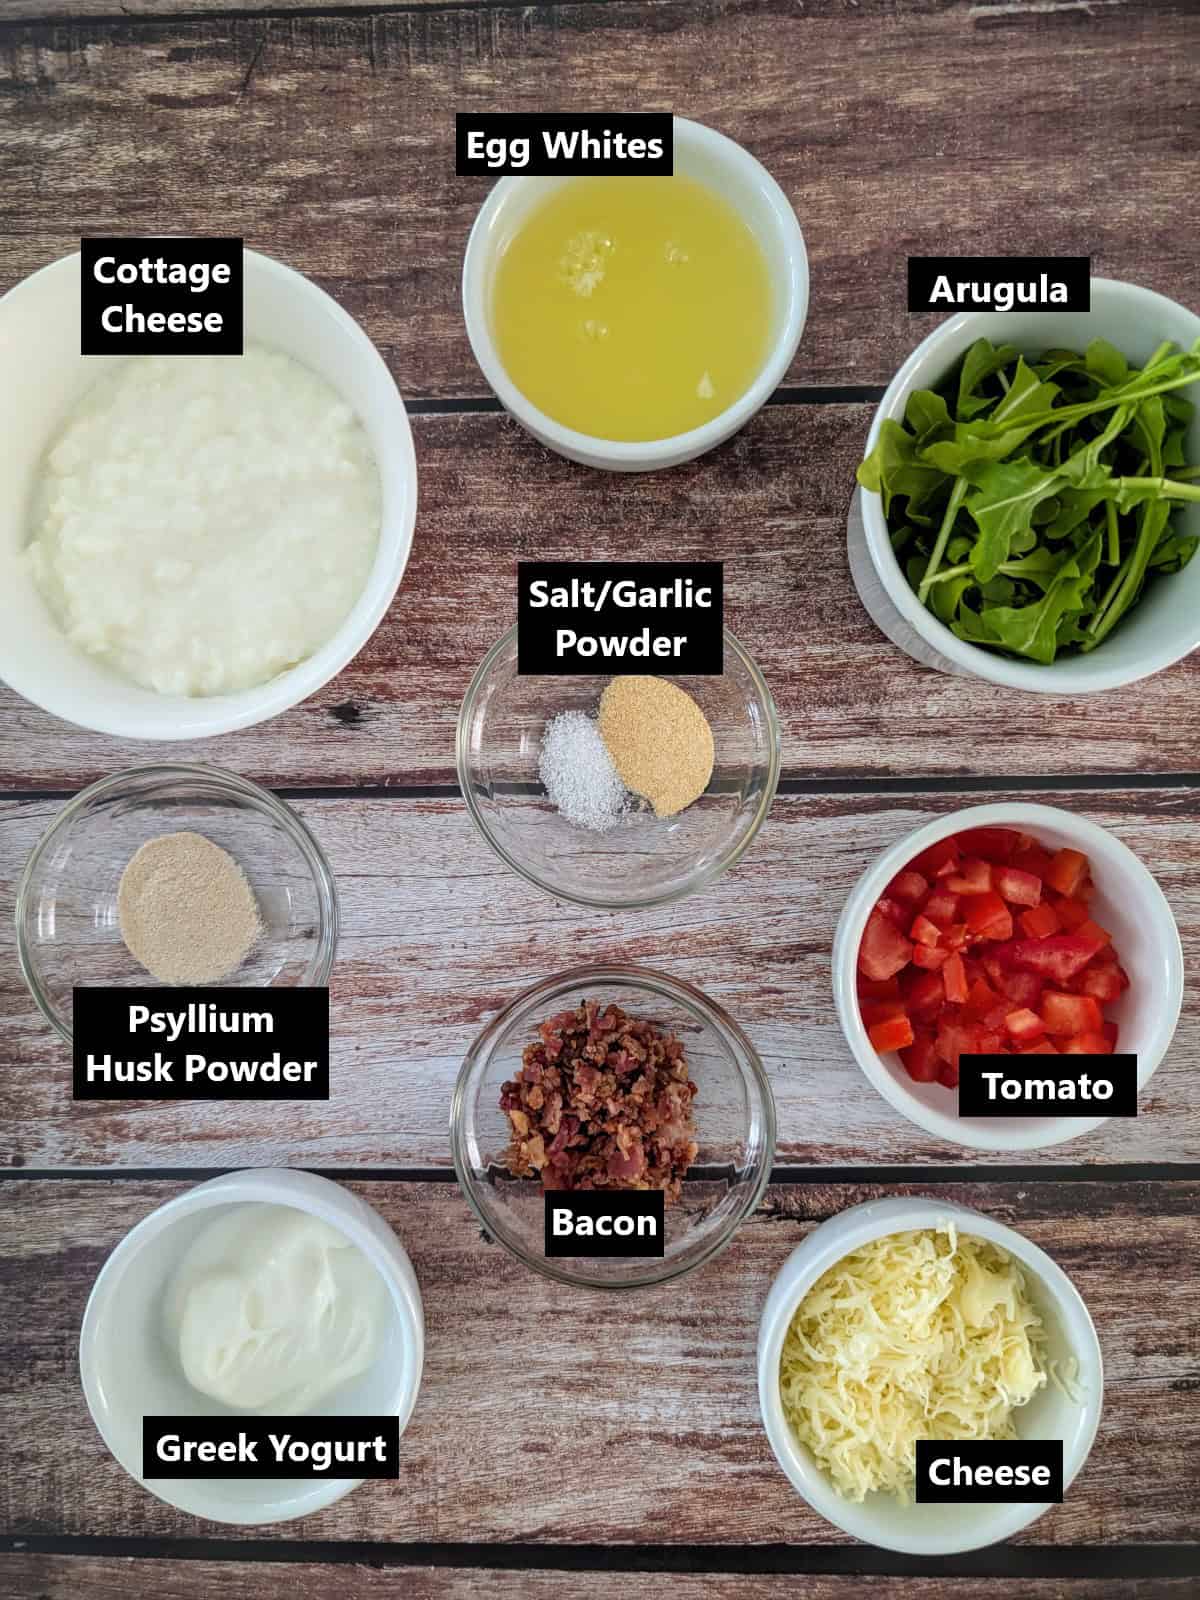
- Cottage cheese: The star of the wrap! It adds creaminess and protein while keeping the base light and fluffy. Use 2% or full-fat cottage cheese, fat-free can be too watery.
- Egg whites: These help bind the wrap together and boost the protein content without adding extra fat. You can use carton egg whites for convenience or separate fresh eggs.
- Psyllium husk powder: A natural fiber that absorbs moisture and helps give structure to the wrap. It replaces flour and acts as a binder — similar to gluten in traditional wraps. It won’t change the flavor but gives a more “tortilla-like” texture.
- Arugula: Like in this Arugula and Spinach Salad, it brings a peppery freshness that balances the richness of the cheese and mushrooms.
- Grated cheese: Mozzarella, cheddar, or a cheese blend all work great. You can even use thin slices of brie. Use what you love.
- Bacon bits: They add salty crunch and savory depth. Store-bought or homemade both work well.
- Diced tomatoes: These add juiciness and a burst of brightness to the filling. Cherry tomatoes work well, but any fresh tomato will do.
***see the recipe card at the end of this post for the full list of ingredients and quantities
Substitutions and Variations
- Egg whites: Whole eggs can be used instead if you don’t mind a bit more fat and calories. Use about 2 whole eggs for every ⅓ cup of egg whites.
- Seasonings: Get creative! Try turmeric for a golden color and earthy flavor, za’atar for a Middle Eastern twist, or chili flakes if you like a bit of heat.
- Greens: Swap arugula for spinach, kale, or even lettuce if you want a milder or crunchier bite.
- Add-in options: Feel free to throw in extras like sliced avocado, roasted red peppers, olives, caramelized onions, or even a scoop of chicken salad or tuna salad (like from this Tuna Salad Lettuce Wraps or this Tuna Caesar Salad ) for extra protein.
- Add a sauce: A drizzle of sauce takes this wrap to the next level. Try it with my Greek Tzatziki Salad Dressing for a cool, refreshing touch, or with my Cilantro Lime Tahini Sauce for a zesty, creamy finish. This Sundried Tomato Dressing would also work great.
- Mushrooms: Add a savory, meaty texture to the filling. Like in my Baked Cod with Mushroom Sauce or these Veal Chops in Mushroom Sauce, any mushroom will work. Try cremini, button, shiitake, or even portobello.
Step-by-Step Instructions - pan-fry method
STEP 1: Preheat a skillet

Preheat a nonstick skillet over medium-low heat and lightly grease with oil. I like to use avocado oil for its high smoke point.
STEP 2: Make the batter

In a blender or food processor, combine all batter ingredients and blend until completely smooth. The mixture should look like a thin pancake batter.
STEP 3: Cook the wraps
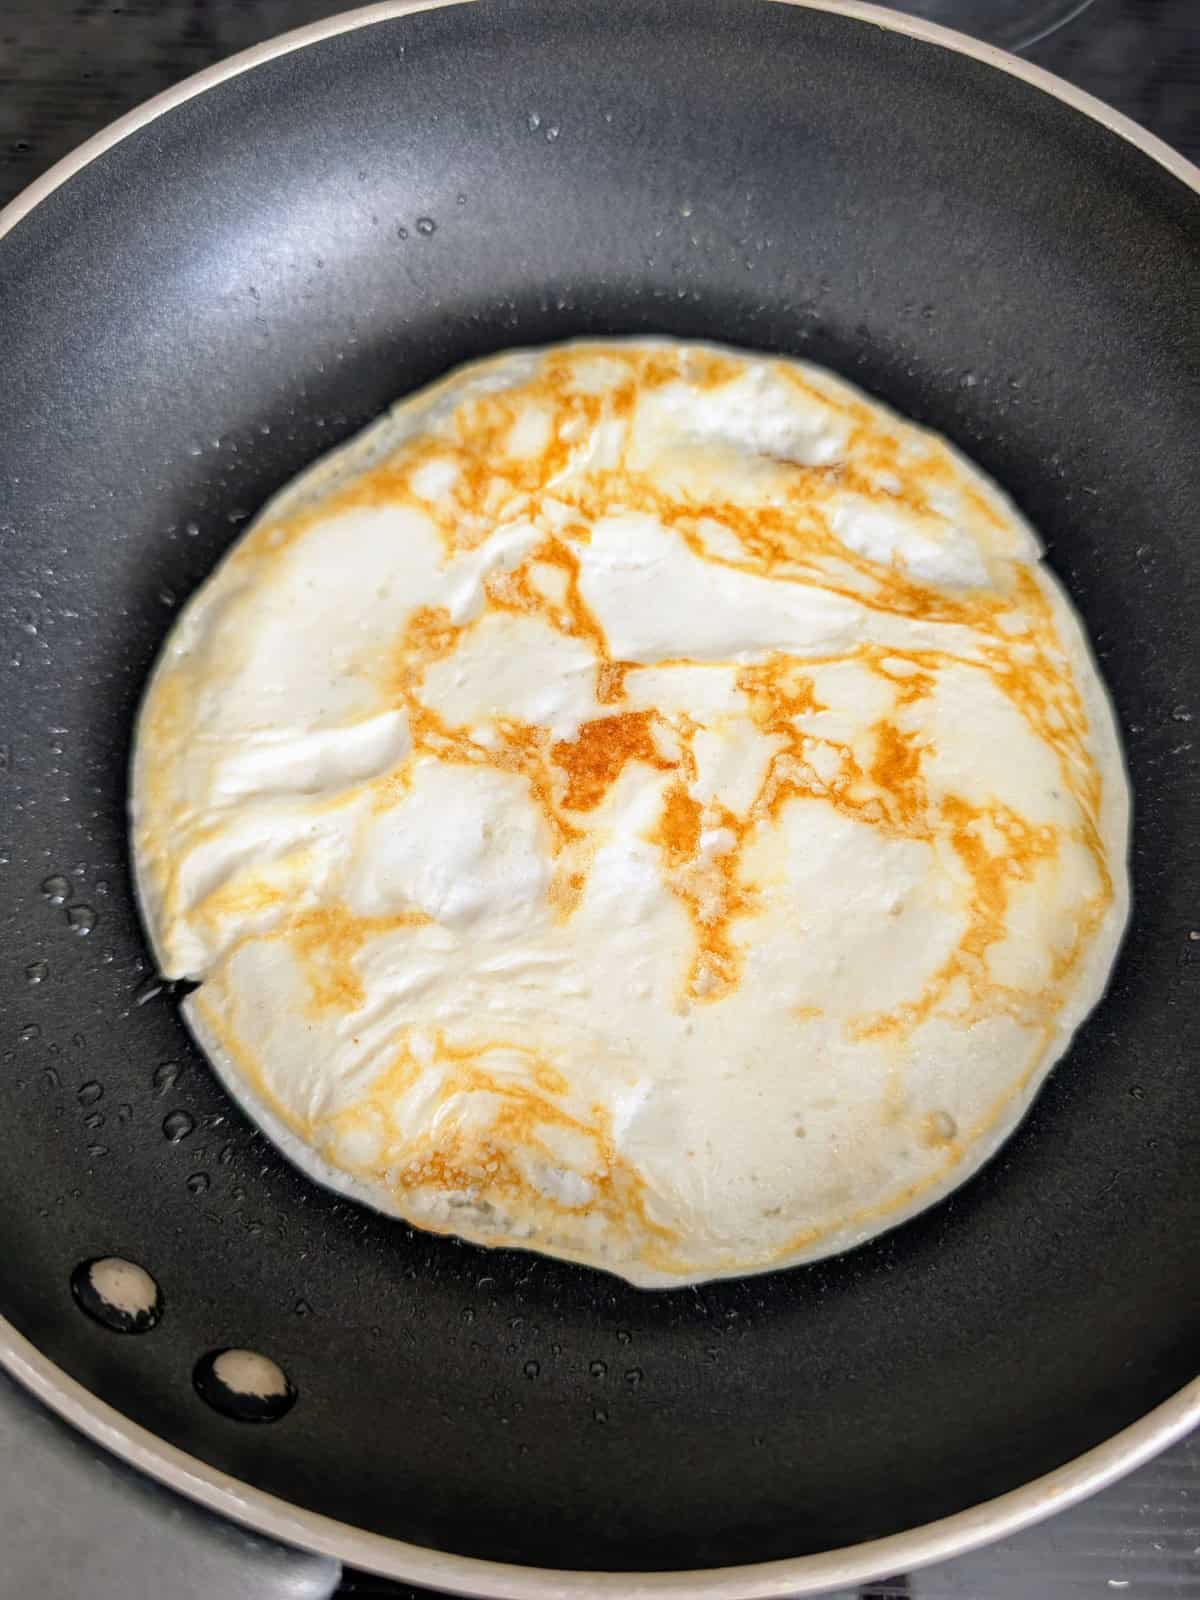
Pour about ¼ to ⅓ cup of the batter into the skillet and tilt the pan in a circle to spread the batter into a thin, even round (like a crepe). Cook for 2-3 minutes or until the edges look dry and the bottom is lightly golden. Carefully flip the wrap with a thin spatula and cook the other side for another 1-2 minutes. Transfer to a plate and repeat with the remaining batter.
STEP 4: Assemble the wrap

Place the cooked wrap on a flat surface or plate and layer on the arugula, bacon bits, grated cheese, and diced tomato. Top with a dollop of Greek Yogurt. Gently roll the wrap like a burrito or fold it taco-style. Optionally, press lightly in a skillet or sandwich to warm the filling and melt the cheese.
Oven-Baked Version for Cottage Cheese Wraps

STEP 1: Preheat the oven to 350°F (175°C) and line a large baking sheet with parchment paper. Lightly spray it with nonstick cooking spray or brush with oil to prevent the wrap from sticking.
STEP 2: Make the batter
In a blender or food processor, combine all batter ingredients and blend until completely smooth.
STEP 3: Assemble the wrap

Pour the batter into the prepared baking sheet and spread it evenly
STEP 4: Make the wraps

Bake for 30-35 minutes, or until the wrap looks dry, firm, and slightly golden around the edges. Cool for 5 minutes, then lift it out using the parchment paper. Slice into 3 even rectangles using a knife or pizza cutter.
STEP 5: Assemble the wrap

Layer on the arugula, bacon bits, grated cheese, and diced tomato. Top with a dollop of Greek yogurt. Gently roll the wrap like a burrito or fold it taco-style. Optionally, press lightly in a skillet or sandwich press to warm the filling and melt the cheese.
Pan-fried vs. Baked Cottage Cheese Wraps
Pan-Fried Wraps: Quick and flexible. They’re soft but slightly crispy around the edges, similar to a crepe. They are easier to fall apart and break, especially when flipping. Psyllium husk powder does help in holding it together.
Baked Wraps: Perfect for meal prep. You can cook several at once on a sheet pan. They do take longer to make though. These wraps are slightly firmer and more uniform in texture, making them great for rolling or folding with heavier fillings.
Recipe Tips
- Customize the wrap with your favorite seasonings: turmeric, za’atar, or chili flakes all work well.
- Be sure you’re using psyllium husk powder, not whole husks. If using whole husks, increase the amount slightly (about 1 tsp).
- Too much psyllium can make the wrap gummy or overly thick, so don’t overdo it.
- Make it your own by trying different fillings like avocado, leftover veggies, or even grilled chicken.
- Don’t overcrowd the filling! Too much filling can make it hard to roll the wrap or cause it to tear.
- Let the wrap cool slightly before filling. It helps it firm up and makes folding or rolling easier without breaking.
Frequently Asked Questions
Yes! You can prep the wrap base in advance and store it in the fridge for up to 3 days. Reheat it in a skillet or oven before adding your filling.
It’s best enjoyed fresh or refrigerated. Freezing may change its texture due to the dairy and egg whites, so it’s not recommended.
This recipe is centered around cottage cheese, so it’s not dairy-free. You definitely don't have to use the grated cheese in the filling. You could try dairy-free alternatives for the wrap itself, but results may vary.
What to Serve With the Wraps
Serve the Easy Cottage Cheese Wrap warm as a nutritious and filling breakfast, lunch, or light dinner. Serve it with Homemade Mayonnaise with Avocado Oil for added flavor and creaminess. Thanks to its high-protein content, it’s a great choice to refuel after exercise. Serve the wrap alongside a fresh salad like this Asparagus Kale Salad, this Salmon and Quinoa Salad, or this Citrus Avocado Salad.
Related Recipes You Might Like


If you tried this Easy Cottage Cheese Wraps recipe or any other recipe on my website, please leave a 🌟 star rating and let me know how it went in the 📝 comments below. Thanks for visiting!
Recipe

Easy Cottage Cheese Wraps (High Protein, Low Carb)
Ingredients
For the wrap:
- 1 tablespoon avocado oil divided, for cooking the wraps - see note one
- 1 cup cottage cheese 2% or full-fat
- ⅓ cup egg whites I used egg whites from the carton, or you can use egg whites from 4 eggs.
- ¼ teaspoon salt
- ½ teaspoon psyllium husk
- ½ teaspoon garlic powder
For the filling:
- ½ cup arugula
- 2 tablespoons bacon bits store-bought or homemade
- ¼ cup grated cheese cheddar, mozzarella, or your favorite
- ¼ cup diced tomatoes
- 1 tablespoon plane Greek yogurt
Instructions
- Preheat an 8-inch nonstick skillet over medium-low heat and lightly grease with oil. I like to use avocado oil for its high smoke point.1 tablespoon avocado oil
- In a blender or food processor, combine all batter ingredients and blend until completely smooth. The mixture should look like a thin pancake batter.1 cup cottage cheese, ⅓ cup egg whites, ¼ tsp salt, ½ tsp psyllium husk, ½ teaspoon garlic powder
- Pour about ⅓ cup of the batter into the skillet and tilt the pan in a circle to spread the batter into a thin, even round (like a crepe). Cook for 2–3 minutes or until the edges look dry and the bottom is lightly golden.
- Carefully flip the wrap with a thin spatula and cook the other side for another 1-2 minutes. Transfer to a plate and repeat with the remaining batter.
- Place the cooked wraps on a flat surface or plate and layer the arugula, bacon bits, grated cheese, and diced tomato onto each wrap. Top with a dollop of Greek Yogurt.½ cup arugula, 2 tablespoons bacon bits, ¼ cup grated cheese, ¼ cup diced tomatoes, 1 tablespoon plane Greek yogurt
- Gently roll the wrap like a burrito or fold it taco-style. Optionally, press lightly in a skillet or sandwich press for 1-2 minutes to warm the filling and melt the cheese.
Notes
-
- You'll need about 1 tablespoon of oil in total for making the 3 wraps.
- Customize the wrap with your favorite seasonings: turmeric, za’atar, or chili flakes all work well.
- Be sure you’re using psyllium husk powder, not whole husks. If using whole husks, increase the amount slightly (about 1 tsp).
- Too much psyllium can make the wrap gummy or overly thick, so don’t overdo it.
- Make it your own by trying different fillings like avocado, leftover veggies, or even grilled chicken.
- Don’t overcrowd the filling! Too much filling can make it hard to roll the wrap or cause it to tear.
- Let the wrap cool slightly before filling. It helps it firm up and makes folding or rolling easier without breaking.
- Oven-Baked Version:
1. Preheat the oven to 350°F (175°C) and line a large baking sheet with parchment paper. Lightly spray it with nonstick cooking spray or brush with oil to prevent the wrap from sticking.
2. Follow step 2 of the main recipe to make the batter, then pour it into the prepared baking sheet and spread evenly.
3. Bake for 30-35 minutes, or until the wrap looks dry, firm, and slightly golden around the edges. Cool for 5 minutes, then lift it out using the parchment paper. Slice into 3 even rectangles using a knife or pizza cutter.
4. Follow steps 5 and 6 of the main recipe to assemble the wraps.


Comments
No Comments