Dinner doesn’t get much easier than this 3-Ingredient Honey Garlic Chicken. It’s a quick, satisfying recipe you can count on during busy weeknights or when you’re just not in the mood to fuss. With sticky-sweet glaze and tender texture, it’s a guaranteed crowd-pleaser, even for picky eaters. So, whether you’re baking it, crisping it up in the air fryer, or stir-frying it on the stovetop, this recipe is a keeper you'll come back to again and again.

This post may contain affiliate links. Read my disclosure policy.
We visited a Japanese restaurant as a family some time ago, and my daughter ordered honey garlic chicken. All I can say is, thankfully, it was all-you-can-eat! She’s usually picky with meat and fills up fast, but that day she devoured the honey garlic chicken and even asked for seconds. A few days later, she started craving it again. Of course, the restaurant version was deep-fried, so one evening, when I was completely out of dinner ideas (and patience) for my picky eaters, I remembered her new obsession. That’s when this simple, homemade honey garlic chicken recipe came to the rescue and saved my busy workday dinner.
It takes less than a handful of ingredients and practically no prep time. This recipe is also versatile enough to work with whatever cooking method you prefer (oven, air fryer, or stovetop), and it pairs beautifully with rice, noodles, or a simple side of these 3-ingredient baked potato wedges. And if you're a fan of the sweet-and-savory combo of honey garlic sauce, don’t miss my Honey Garlic Eggplant and Shrimp for a delicious seafood twist.
Recipe Overview
⏱️ Ready in: 30 minutes - baking method is a bit longer
🍽️ Servings: 4
💪 Diet-Friendly: Nut-Free, Kid-Friendly, Meal-Prep Friendly
🔥 Cooking Methods: Oven, Air Fryer, or Stovetop
Jump to:
Why You’ll Love This Recipe
- It’s picky-eater approved: Like this Pesto Orzo Salad with Grilled Corn, even the pickiest of eaters love it!
- It’s fast and fuss-free: With barely any prep work and only a few ingredients, the recipe is perfect for busy weeknights.
- It’s versatile: Bake it, air fry it, or stir-fry it. Whatever works best for your schedule and kitchen.
- No oil needed: Like in my Stir-Fried Chicken Thighs recipe, the fat from the chicken thighs naturally renders out, so it cooks beautifully in its own flavorful juices.
Ingredients

- Chicken: I use boneless, skinless chicken thighs and cut each one into bite-sized pieces (about 6-8 pieces per thigh). This makes them cook quickly and evenly.
- Salt: A simple sprinkle of salt enhances the natural flavor of the chicken and balances the sweetness of the sauce. Don’t skip it, even though there is salt in the sauce.
- Honey Garlic: I love using VH Honey Garlic Sauce for this recipe. It’s thick, flavorful, and perfectly balanced between sweet and savory.
See the recipe card below for the full ingredient list and exact measurements.
Substitutions and Variations
- Chicken: You can substitute with chicken breast (like we use in this Chicken in Spaghetti Nests recipe) if you prefer leaner meat, but it may be less juicy. Chicken drumsticks or wings also work, just adjust the cooking time as needed.
- Honey Garlic Sauce: If you don’t have VH Honey Garlic Sauce, you can use another store-bought brand or make a quick homemade version by mixing honey, minced garlic, soy sauce, and a splash of lemon juice or apple cider vinegar. For a soy-free version, use coconut aminos (just make sure it’s thick enough to coat the chicken).
- Make it spicy: Add red pepper flakes, hot honey, or a drizzle of sriracha to the sauce before cooking.
- Add ginger: Add fresh grated ginger to your sauce for a warm, aromatic note.
- Garnish: I used sesame seeds, but you can also garnish with fresh chopped parsley, cilantro, or green onions (like in this Creamy Seafood Chowder Casserole) before serving.
Step-by-Step Instructions
Stir-frying is my go-to method for this honey garlic chicken. But baking and air frying are also excellent options, especially if you want a more hands-off method. You’ll find instructions for all three cooking methods in the recipe card at the end of this post.
STEP 1: Sauté the Chicken

Heat a pan over medium-high heat. Add the chicken and season with salt. Sauté for a few minutes, stirring occasionally, until the chicken starts to release liquid.
STEP 2: Add the sauce
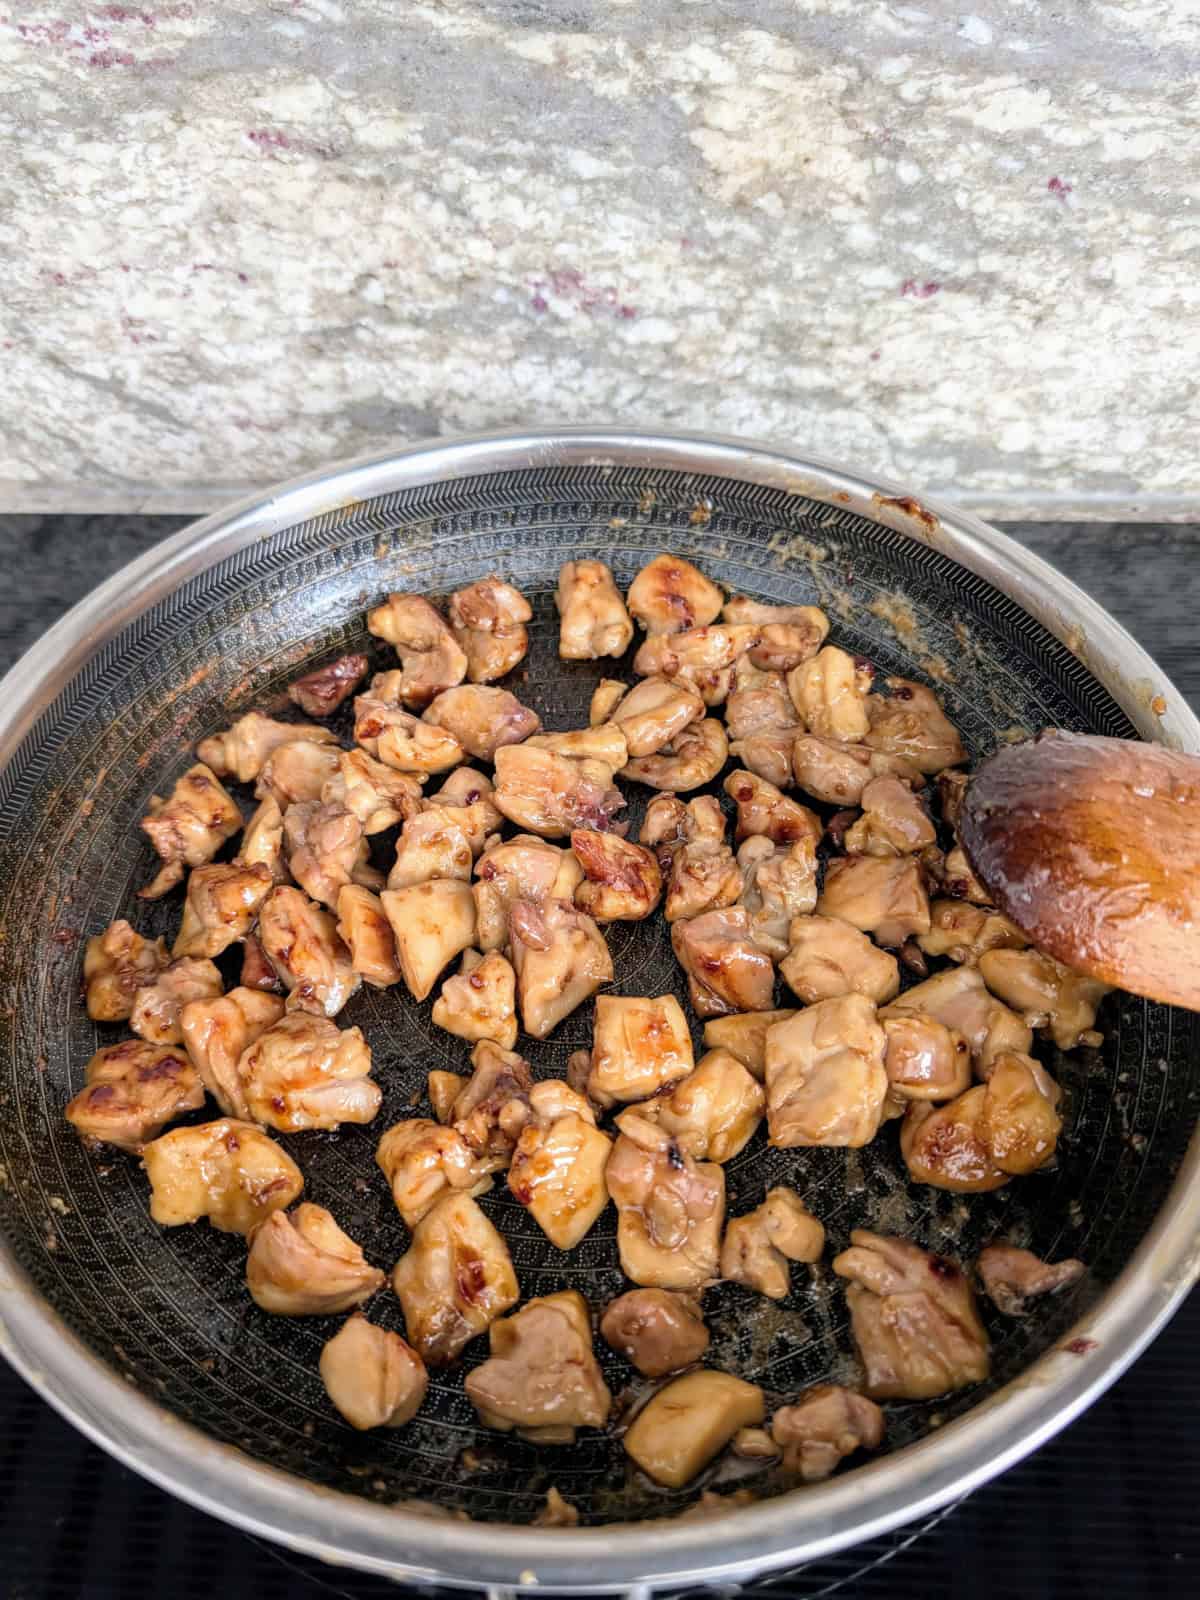
Stir in the honey garlic sauce and continue cooking until the liquid has fully evaporated and the chicken is nicely glazed and caramelized.
Top Tips for the Best Honey Garlic Chicken
- Aim for uniform, bite-sized, pieces so they cook evenly. I usually cut each thigh into about 6-8 pieces.
- Don’t rush the final stage of cooking. Allowing the sauce to reduce and the chicken to caramelize is what gives this dish its sticky-sweet glaze.
- Don’t overcrowd the pan or air fryer. Cook in batches if needed. Giving each piece enough space helps it brown and crisp up instead of steam.
- When air frying, use parchment paper with holes or an air fryer liner to catch sticky drips and make cleanup easier.
- Avoid “boiled” baked chicken (if baking): as the chicken naturally releases liquid, it's important to carefully pour off most of the liquid about half way through baking and then stir in the sauce and return it to the oven to caramelize.
Frequently Asked Questions
Yes, you can use honey in an air fryer, but timing is important. Honey has a low burning point, so if it’s added too early, it can burn and turn bitter. The best way is to toss or brush the chicken in honey (or honey garlic sauce) midway through cooking. You can also add a second coat of sauce during the last few minutes to let it caramelize without burning.
That all depends on the sauce you use. VH Honey Garlic Sauce is not certified gluten-free, so be sure to check the label or choose a gluten-free brand or homemade sauce using tamari or coconut aminos instead of soy sauce.
Yes! This recipe is really great for meal prep. Cook and store it in an airtight container in the fridge for up to 4 days. Reheat it in a skillet or microwave. It also freezes well, just cool it completely and freeze it in a freezer-safe container for up to 2 months.
Serving suggestions
This sticky, savory-sweet honey garlic chicken is super versatile and pairs well with so many sides! Here are some easy ideas to turn it into a complete meal:
- On a salad: Serve room temperature over a green salad with a light sesame or ginger dressing for a quick lunch.
- With potatoes: Serve it alongside these Oven Roasted Potato Cubes or over these mashed potatoes without butter.
- With rice or pasta: Spoon the chicken (and all that glossy sauce!) over a bowl of rice or noodles for a satisfying, saucy meal. Or serve it next to a pasta salad like this One-Pot Vegetable Pasta Salad with Ribbon-Style Veggies.
- With vegetables: Add a fresh side like sautéed broccoli, snap peas, or these Air Fryer Roasted Vegetables.
- Stuff it in wraps: Use leftovers in wraps or pitas with crunchy veggies and a drizzle of extra sauce. Yum!
Other delicious meat recipes


If you tried this 3-Ingredient Honey Garlic Chicken (3 ways!) recipe or any other recipe on my website, please leave a 🌟 star rating and let me know how it went in the 📝 comments below. And feel free to tag me on Instagram @cre8athome so I can see your creations! Thanks for visiting!
Recipe

3-Ingredient Honey Garlic Chicken (3 ways!)
Equipment
- Baking Sheet for the baking method
- Parchment Paper for the baking method
- Air Fryer for the air fryer method
- Air fryer Liners for the air fryer method - optional
- Large Skillet for the stir-frying method
Ingredients
- 8 chicken thighs skinless, boneless - cut into 6-8 pieces
- ¾ teaspoon salt plus more to taste
- ¼ cup Honey Garlic Sauce I used VH Honey Garlic Marinade
Instructions
Stir-Frying (my personal go-to method):
- Heat a skillet over medium-high heat. Add the bite-sized chicken thighs and season with salt.8 chicken thighs, ¾ teaspoon salt
- Sauté for a few minutes, stirring occasionally, until the chicken starts to release its liquid and partially cooks.
- Stir in the honey garlic sauce and continue cooking, stirring often, until the sauce fully reduces and the chicken is glazed and caramelized.¼ cup Honey Garlic Sauce
Air Fryer Method
- Preheat your air fryer to 380°F (195°C) and 15 minutes. Line with a perforated liner or silicone mat, if using.
- Place the cut chicken thighs into the air fryer basket or bowl. Season with salt and toss to coat.8 chicken thighs, ¾ teaspoon salt
- Cook for 6–7 minutes, then toss in the honey garlic sauce and stir well.8 chicken thighs
- Continue air frying for another 6–8 minutes, or until the chicken is fully cooked, caramelized, and slightly crisp on the edges. Shake the basket as needed for even cooking.
Oven-Baked Method
- Preheat your oven to 400°F (200°C). Line a baking sheet with parchment paper.
- Place the cut chicken thighs on the lined sheet and season with salt, tossing gently to coat.8 chicken thighs, ¾ teaspoon salt
- Bake for 15-20 minutes, then carefully pour out any liquid that has accumulated.
- Toss the chicken with the honey garlic sauce, return to the oven, and bake for another 15-20 minutes, or until the chicken is cooked through and glazed.8 chicken thighs
- For extra caramelization, broil for 2–3 minutes at the end.
Notes
- Aim for uniform, bite-sized, pieces so they cook evenly. I usually cut each thigh into about 6-8 pieces.
- Don’t rush the final stage of cooking. Allowing the sauce to reduce and the chicken to caramelize is what gives this dish its sticky-sweet glaze.
- Don’t overcrowd the pan or air fryer. Cook in batches if needed. Giving each piece enough space helps it brown and crisp up instead of steam.
- When air frying, use parchment paper with holes or an air fryer liner to catch sticky drips and make cleanup easier.
- Avoid “boiled” baked chicken (if baking): as the chicken naturally releases liquid, it's important to carefully pour off most of the liquid about half way through baking and then stir in the sauce and return it to the oven to caramelize.


Comments
No Comments